Project: Provisioning Kubernetes Cluster on AWS with Terraform
A project for practicing and learning IAC using Terraform

I am an electrical engineer with a passion for DevOps and Cloud Engineering, I bring a unique perspective to the world of technology. My expertise includes a wide range of skills including DevOps methodologies, AWS Cloud, Jenkins, CI/CD, MAVEN, Linux, Shell Scripting, Python, YAML scripts, Groovy Scripts, Assembly language, Ansible, Docker, Kubernetes, Grafana, Tomcat, GitHub, Git, Docker Swarm, Terraform IaC, Cloud Engineering, and Networking. With a deep understanding of these technologies, I am able to design and implement complex systems that are both efficient and scalable. Whether working with large-scale enterprise systems or small startups, I am dedicated to delivering innovative solutions that drive success.
Prerequisites
Before we get started, you'll need to have the following:
An AWS account
A local Windows 8/10/11 machine with Terraform installed
Basic knowledge of Kubernetes and Terraform
Introduction
This blog will walk you through the process of creating a Kubernetes cluster on Amazon Web Services (AWS) using Terraform. Kubernetes has become the go-to container orchestration platform, and AWS provides a reliable and scalable infrastructure for hosting your Kubernetes clusters. By leveraging Terraform, infrastructure as code (IaC) tool, we can define and provision the necessary resources and configurations needed to set up a Kubernetes cluster in a repeatable and automated manner.
In this blog, we will cover every step required to create a fully functional Kubernetes cluster on AWS. We'll start by utilizing Terraform's declarative syntax to define the infrastructure components necessary for our cluster. This includes creating a Virtual Private Cloud (VPC) that will serve as the networking foundation for our cluster, configuring subnets within the VPC for availability and fault tolerance, and setting up security groups to control inbound and outbound traffic.
Once the foundational infrastructure is in place, we'll move on to provisioning EC2 instances, which will serve as the worker nodes for our Kubernetes cluster. These instances will be customized with the required packages, configurations, and dependencies needed to support Kubernetes. By leveraging Terraform's provisioning capabilities, we can automatically install and configure the necessary software components, such as Docker and kubelet, to ensure a smooth deployment of our Kubernetes cluster.
By following this blog, you will gain a deep understanding of the entire process involved in creating a Kubernetes cluster on AWS using Terraform. Whether you are a seasoned DevOps engineer or a beginner exploring containerization and orchestration technologies, this tutorial will equip you with the knowledge and skills to set up your own scalable and resilient Kubernetes cluster on AWS. So let's dive in and embark on this exciting journey of creating a Kubernetes cluster using Terraform on AWS!
What is main.tf file?
The main.tf file is a configuration file used in infrastructure provisioning and management with Terraform. Terraform is an open-source infrastructure as code (IaC) tool that allows you to define and create infrastructure resources across various cloud providers and services.
In Terraform, the main.tf file serves as the entry point for defining and organizing your infrastructure resources. It contains the main configuration for your infrastructure, including the definition of resources, providers, variables, and other settings.
Within the main.tf file, you specify the desired state of your infrastructure using a declarative syntax. This means you describe what resources you want to create, configure, or manage, rather than specifying how to achieve those states.
By running Terraform commands, such as terraform init, terraform plan, and terraform apply, you can initialize the Terraform environment, plan the changes to be made, and apply those changes to create or modify the infrastructure resources defined in the main.tf file.
Overall, the main.tf file plays a central role in defining and orchestrating your infrastructure using Terraform's configuration language.
Project Steps:
Step 1: Create an IAM user
This step is to create an IAM user in your AWS account with the necessary permissions to create EC2 instances and provision a Kubernetes cluster.
To create an IAM user, follow these steps:
Go to the AWS Management Console and navigate to the IAM service.
Click on "Users" in the left navigation menu and then click on "Add user".
Enter a username for the new IAM user and select "Programmatic access" as the access type.
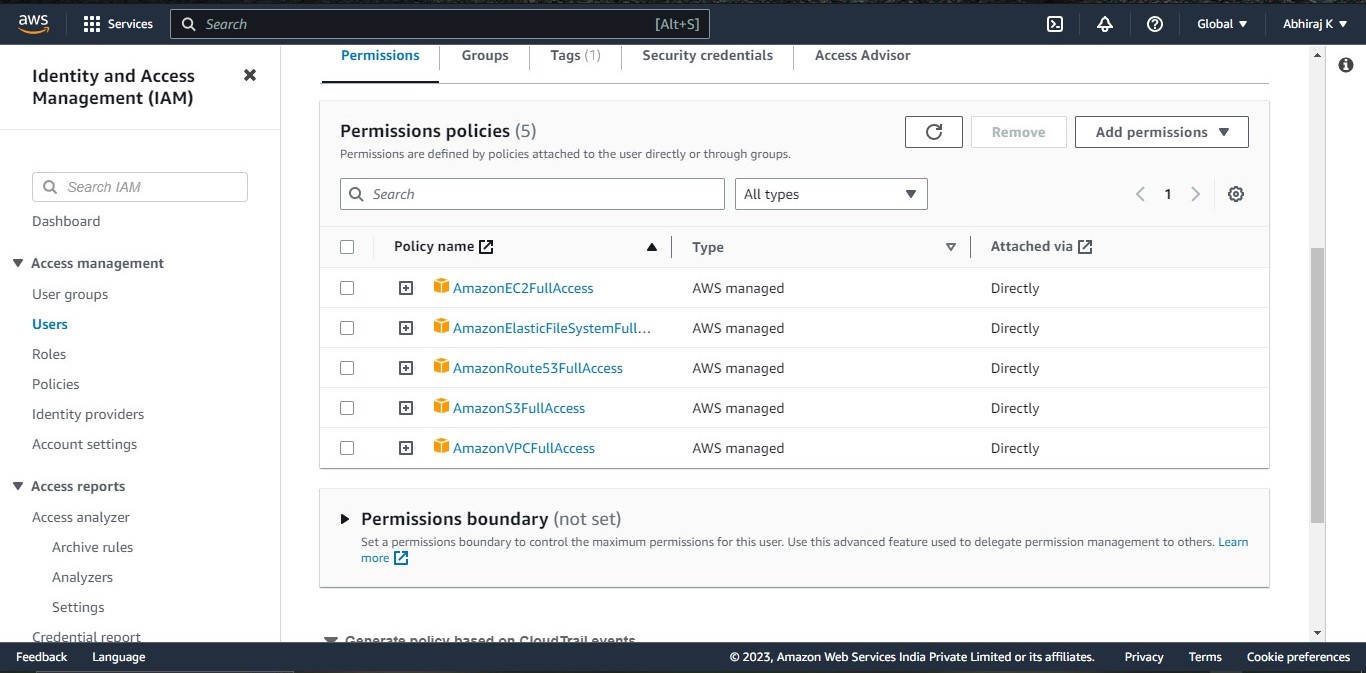
Click on "Next: Permissions" and then select "Attach existing policies directly". Search for and select the following policies: "AmazonEC2FullAccess", "AmazonVPCFullAccess", "AmazonRoute53FullAccess", "AmazonElasticFileSystemFullAccess", "AmazonS3FullAccess", and "AmazonEKSFullAccess".
Click on "Next: Tags" and then add any desired tags (optional).
Click on "Next: Review" and then review the settings for the new IAM user. Click on "Create user" to create the new IAM user.
Make sure to save the access key and secret key for the new IAM user, as we'll need these later.
Step 2: Write your main.tf file
Let's write each block in the main.tf file :
Block 1: AWS Provider Block
provider "aws" {
  access_key = "****"
  secret_key = "****"
  region     = "us-east-1"
}
This block defines the provider, in this case, "aws". It specifies the access key, secret key, and region to use when interacting with the AWS (Amazon Web Services) API. You need to replace the "****" placeholders with your actual access key and secret key.
Block 2: AWS VPC Resource Block
resource "aws_vpc" "k8s_vpc" {
  cidr_block = "10.0.0.0/16"
}
This block defines an AWS VPC (Virtual Private Cloud) resource with the name "k8s_vpc". It specifies the IP address range for the VPC using the CIDR block notation.
Block 3: AWS Subnet Resource Block (Public Subnet)
resource "aws_subnet" "k8s_public_subnet" {
  vpc_id     = aws_vpc.k8s_vpc.id
  cidr_block = "10.0.1.0/24"
}
This block defines an AWS subnet resource with the name "k8s_public_subnet" within the VPC. It specifies the VPC ID to which this subnet belongs (aws_vpc.k8s_vpc.id) and the IP address range for the subnet.
Block 4:AWS Subnet Resource Block (Private Subnet)
resource "aws_subnet" "k8s_private_subnet" {
  vpc_id     = aws_vpc.k8s_vpc.id
  cidr_block = "10.0.2.0/24"
}
This block defines another AWS subnet resource with the name "k8s_private_subnet" within the same VPC. It also specifies the VPC ID and the IP address range for the subnet.
Block 5:AWS Security Group Resource Block
resource "aws_security_group" "k8s_security_group" {
  vpc_id = aws_vpc.k8s_vpc.id

  ingress {
    from_port   = 22
    to_port     = 22
    protocol    = "tcp"
    cidr_blocks = ["0.0.0.0/0"]
  }

  ingress {
    from_port   = 80
    to_port     = 80
    protocol    = "tcp"
    cidr_blocks = ["0.0.0.0/0"]
  }

  ingress {
    from_port   = 443
    to_port     = 443
    protocol    = "tcp"
    cidr_blocks = ["0.0.0.0/0"]
  }

  egress {
    from_port   = 0
    to_port     = 0
    protocol    = "-1"
    cidr_blocks = ["0.0.0.0/0"]
  }
}
This block defines an AWS security group resource with the name "k8s_security_group". It specifies that this security group belongs to the VPC (aws_vpc.k8s_vpc.id).
ingressblocks: These blocks define inbound traffic rules for the security group. Eachingressblock specifies a range of ports, a protocol, and a set of CIDR blocks (IP ranges) that are allowed to access those ports.The first
ingressblock allows TCP traffic on port 22 (SSH) from any IP address (0.0.0.0/0represents all IPv4 addresses).The second
ingressblock allows TCP traffic on port 80 (HTTP) from any IP address.The third
ingressblock allows TCP traffic on port 443 (HTTPS) from any IP address.
egressblock: This block defines outbound traffic rules for the security group. Theegressblock specifies that all outbound traffic (any protocol, any port) is allowed to any destination IP address (0.0.0.0/0).
Block 6:AWS EC2 Instance Resource Block (Master Node)
resource "aws_instance" "k8s_master_instance" {
  ami           = "ami-007855ac798b5175e"
  instance_type = "t2.medium"
  key_name      = "abhinew"
  subnet_id     = aws_subnet.k8s_private_subnet.id
  vpc_security_group_ids = [aws_security_group.k8s_security_group.id]

  user_data = <<-EOF
    #!/bin/bash
    apt-get update
    apt-get install -y docker.io
    usermod -aG docker ubuntu
    systemctl enable docker
    systemctl start docker
    curl -fsSLo /usr/share/keyrings/kubernetes-archive-keyring.gpg https://packages.cloud.google.com/apt/doc/apt-key.gpg
    echo "deb [signed-by=/usr/share/keyrings/kubernetes-archive-keyring.gpg] https://apt.kubernetes.io/ kubernetes-xenial main" | sudo tee /etc/apt/sources.list.d/kubernetes.list
    apt update -y
    apt install kubeadm=1.20.0-00 kubectl=1.20.0-00 kubelet=1.20.0-00 -y
    kubeadm init --pod-network-cidr=10.244.0.0/16 --ignore-preflight-errors=NumCPU
    mkdir -p $HOME/.kube
    cp -i /etc/kubernetes/admin.conf $HOME/.kube/config
    chown $(id -u):$(id -g) $HOME/.kube/config
    kubectl apply -f "https://cloud.weave.works/k8s/net?k8s-version=$(kubectl version | base64 | tr -d '\n')"
  EOF
}
This block defines an AWS EC2 instance resource with the name "k8s_master_instance". It specifies the AMI (Amazon Machine Image) ID, instance type, key pair name, and the subnet ID where the instance should be launched. It also associates the instance with the previously defined security group.
The user_data section in this block contains a bash script that will be executed during instance launch. Here's an explanation of the script:
apt-get update: Updates the package lists for the APT package manager.apt-get install -ydocker.io: Installs Docker.usermod -aG docker ubuntu: Adds the "ubuntu" user to the "docker" group to allow Docker commands without sudo.systemctl enable docker: Enables Docker to start on system boot.systemctl start docker: Starts the Docker service.curl -fsSLo /usr/share/keyrings/kubernetes-archive-keyring.gpghttps://packages.cloud.google.com/apt/doc/apt-key.gpg: Downloads the GPG key for Kubernetes package repository.echo "deb [signed-by=/usr/share/keyrings/kubernetes-archive-keyring.gpg]https://apt.kubernetes.io/kubernetes-xenial main" | sudo tee /etc/apt/sources.list.d/kubernetes.list: Adds the Kubernetes package repository to the APT sources list.apt update -y: Updates the package lists again to include the Kubernetes packages.apt install kubeadm=1.20.0-00 kubectl=1.20.0-00 kubelet=1.20.0-00 -y: Installs specific versions of kubeadm, kubectl, and kubelet.kubeadm init --pod-network-cidr=10.244.0.0/16 --ignore-preflight-errors=NumCPU: Initializes the Kubernetes master node with a specified pod network CIDR and ignores the CPU preflight errors.`mkdir - p $HOME/.kube: Creates the .kube` directory in the user's home directory.cp -i /etc/kubernetes/admin.conf $HOME/.kube/config: Copies the Kubernetes admin configuration to the user's.kube/configfile.chown $(id -u):$(id -g) $HOME/.kube/config: Changes the ownership of the config file to the user.kubectl apply -f "[https://cloud.weave.works/k8s/net?k8s-version=$(kubectl](https://cloud.weave.works/k8s/net?k8s-version=$(kubectl)version | base64 | tr -d '\n')": Applies the Weave Net CNI (Container Network Interface) plugin to the cluster for networking.
Block 7:AWS EC2 Instance Resource Block (Worker Node)
resource "aws_instance" "k8s_instance" {
  ami           = "ami-007855ac798b5175e"
  instance_type = "t2.micro"
  key_name      = "abhinew"
  subnet_id     = aws_subnet.k8s_public_subnet.id
  vpc_security_group_ids = [aws_security_group.k8s_security_group.id]

  user_data = <<-EOF
    #!/bin/bash
    apt-get update
    apt-get install -y docker.io
    usermod -aG docker ubuntu
    systemctl enable docker
    systemctl start docker
    curl -fsSLo /usr/share/keyrings/kubernetes-archive-keyring.gpg https://packages.cloud.google.com/apt/doc/apt-key.gpg
    echo "deb [signed-by=/usr/share/keyrings/kubernetes-archive-keyring.gpg] https://apt.kubernetes.io/ kubernetes-xenial main" | sudo tee /etc/apt/sources.list.d/kubernetes.list
    apt update -y
    apt install kubeadm=1.20.0-00 kubectl=1.20.0-00 kubelet=1.20.0-00 -y
    kubeadm reset --force
  EOF
}
This block defines another AWS EC2 instance resource with the name "k8s_instance". It is similar to the previous instance block but uses a different instance type and subnet.
The user_data section in this block contains a similar bash script that will be executed during the launch of the worker node instance. Here's an explanation of the script:
The script is almost identical to the one in the master node block, with a few differences.
After installing the required packages and configuring Docker, it resets the Kubernetes configuration on the worker node using
kubeadm reset --force.This ensures that the worker node starts fresh and is ready to join a Kubernetes cluster.
Note: Make sure to replace the placeholder values (such as AMI IDs, key names, etc.) with the appropriate values based on your AWS environment.
These blocks define the necessary AWS resources (VPC, subnets, security groups, and EC2 instances) required for setting up a Kubernetes cluster. The user_data section in the instance blocks contains the bash script that will be executed during instance launch to configure Docker, install Kubernetes components, and perform cluster initialization.
Combine all thse blocks into one file and rename it as main.tf.
Now your main.tf is ready place this file in a new directory and launch a terminal in that directory/ use cmd promt.
Step 3: Initialize the working directory

Use terraform init command in your terminal window.
The terraform init command initializes the working directory by downloading the necessary provider plugins and setting up the backend configuration. It reads the terraform block in your main.tf files and installs the required provider(s) specified in the configuration.
Step 4: Generate an execution plan
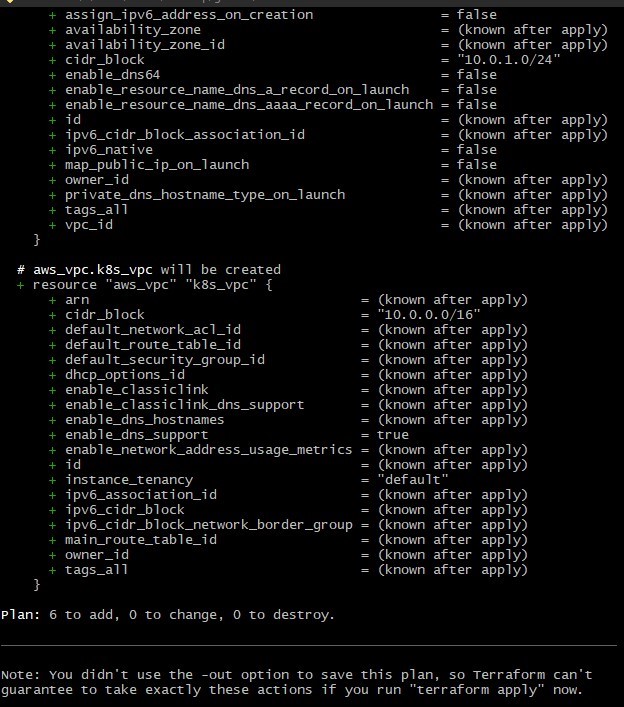
Use terraform plan command in your terminal window.
The terraform plan command generates an execution plan based on the current state and the desired state described in your main.tf files. It shows the changes that Terraform will make to your infrastructure when applied. It's a good practice to review the plan to ensure it aligns with your intentions.
Step 5: Apply the changes
Use terraform apply command in your terminal window.
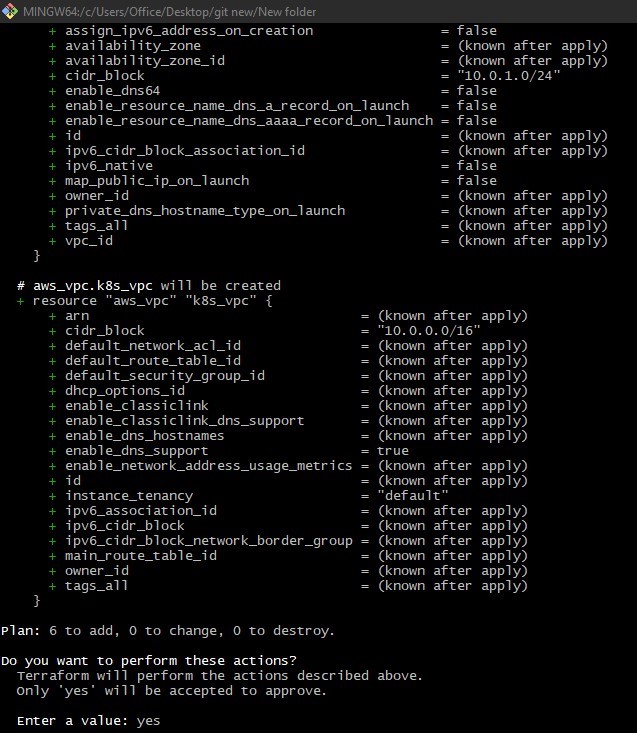
The terraform apply command applies the changes defined in your .tf files. It creates, modifies, or destroys resources to match the desired state. Before proceeding, Terraform will prompt for confirmation to apply the changes based on the execution plan.
Step 6: Confirm the changes
Type yes and press Enter to confirm the changes and proceed with applying the plan. Terraform will then begin applying the changes to your infrastructure.
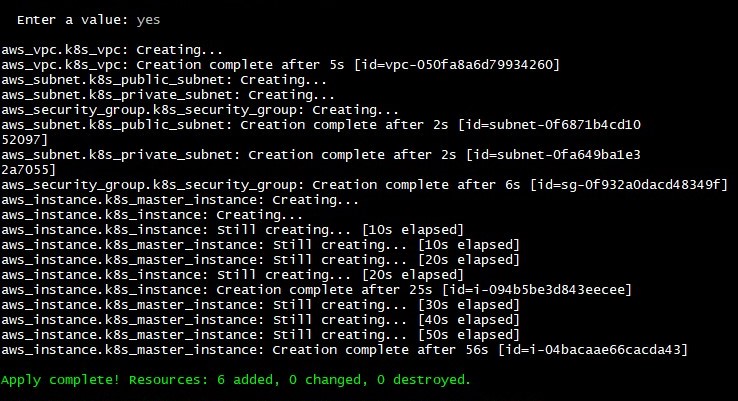
During the apply process, Terraform will create, modify, or destroy resources as necessary to reach the desired state. It will output the changes being made and provide the final state of the infrastructure.
Output:
When this Terraform configuration file is executed, it will create the following AWS resources:
AWS VPC (Virtual Private Cloud) with the CIDR block "10.0.0.0/16".
Public subnet within the VPC with the CIDR block "10.0.1.0/24".
Private subnet within the VPC with the CIDR block "10.0.2.0/24".
AWS security group that allows incoming traffic on ports 22, 80, and 443, and allows all outgoing traffic.
EC2 (Elastic Compute Cloud) instance for the Kubernetes master with the specified AMI (Amazon Machine Image), instance type, key name, subnet ID, and security group.
EC2 instance for the Kubernetes worker with the specified AMI, instance type, key name, subnet ID, and security group.
In addition to creating the instances, user data scripts are provided for both the master and worker instances. These scripts contain commands that will be executed when the instances are launched. The user data script for the master instance performs the following tasks:
Updates the package repositories and installs Docker.
Configures Docker and starts the Docker service.
Sets up the Kubernetes package repository.
Installs specific versions of Kubernetes components (kubeadm, kubectl, kubelet).
Initializes the Kubernetes cluster with a pod network CIDR and ignores preflight errors.
Configures the Kubernetes client (kubectl) to use the cluster.
Deploys the Weave Net pod network.
Conclusion:
In this blog, we have learned how to create a Kubernetes cluster on Amazon Web Services (AWS) using Terraform. By leveraging Terraform's infrastructure as code (IaC) capabilities, we can define and provision the necessary AWS resources and configurations in a repeatable and automated manner.
This blog provides step-by-step instructions, starting with the prerequisites of having an AWS account, a Windows 8/10/11 machine with Terraform installed, and basic knowledge of Kubernetes and Terraform. It then guides us through the process of creating a fully functional Kubernetes cluster on AWS.
Please share your thoughts and opinions on this topic in the comments section below.
The above information is up to my understanding and learning experience. Suggestions are always welcome.
~Abhiraj kharbade
#DevOps #AWS #Kubernetes #terraform #IAC
Connect with me :


