A Step-by-Step Guide to Creating an AWS Free Tier Account
With AWS Account Activation Troubleshooting

I am an electrical engineer with a passion for DevOps and Cloud Engineering, I bring a unique perspective to the world of technology. My expertise includes a wide range of skills including DevOps methodologies, AWS Cloud, Jenkins, CI/CD, MAVEN, Linux, Shell Scripting, Python, YAML scripts, Groovy Scripts, Assembly language, Ansible, Docker, Kubernetes, Grafana, Tomcat, GitHub, Git, Docker Swarm, Terraform IaC, Cloud Engineering, and Networking. With a deep understanding of these technologies, I am able to design and implement complex systems that are both efficient and scalable. Whether working with large-scale enterprise systems or small startups, I am dedicated to delivering innovative solutions that drive success.
Introduction
Amazon Web Services (AWS) is a comprehensive cloud computing platform that offers a wide range of services and resources to individuals and businesses alike. Whether you're an aspiring developer, a small startup or an enterprise, AWS provides a robust infrastructure and tools to meet your computing needs.
In this blog post, I'll walk you through the process of creating an AWS Free Tier account, allowing you to explore and experiment with AWS services at no cost.
Steps
Follow the following steps for creating an AWS Free Tier account
Step 1:
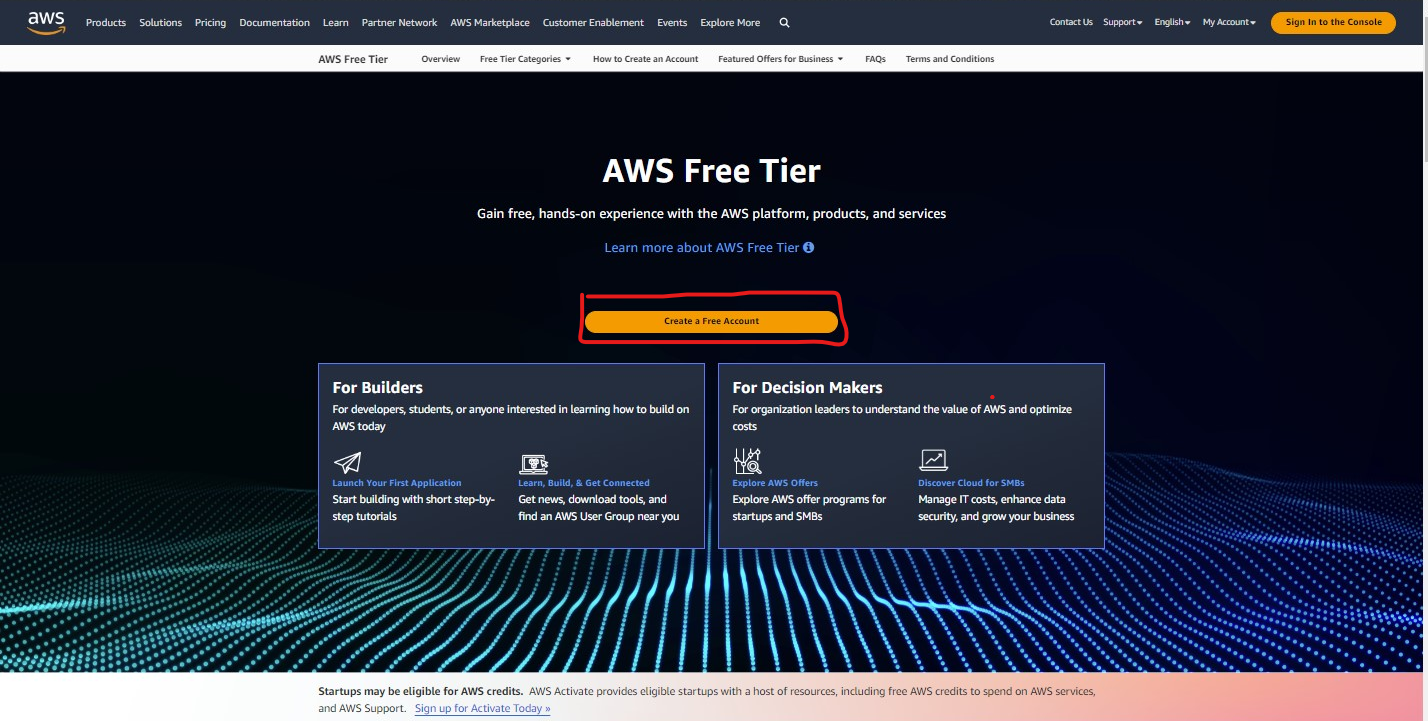
Visit the AWS Free Tier webpage To begin, open your web browser and navigate to the AWS Free Tier webpage (https://aws.amazon.com/free). This page provides an overview of the free services available, along with the benefits and limitations of the AWS Free Tier.

Step 2:
Click on "Create an AWS Account" On the AWS Free Tier webpage, you'll find a prominent button labeled "Create an AWS Account." Click on this button to proceed to the account creation page.
Step 3:
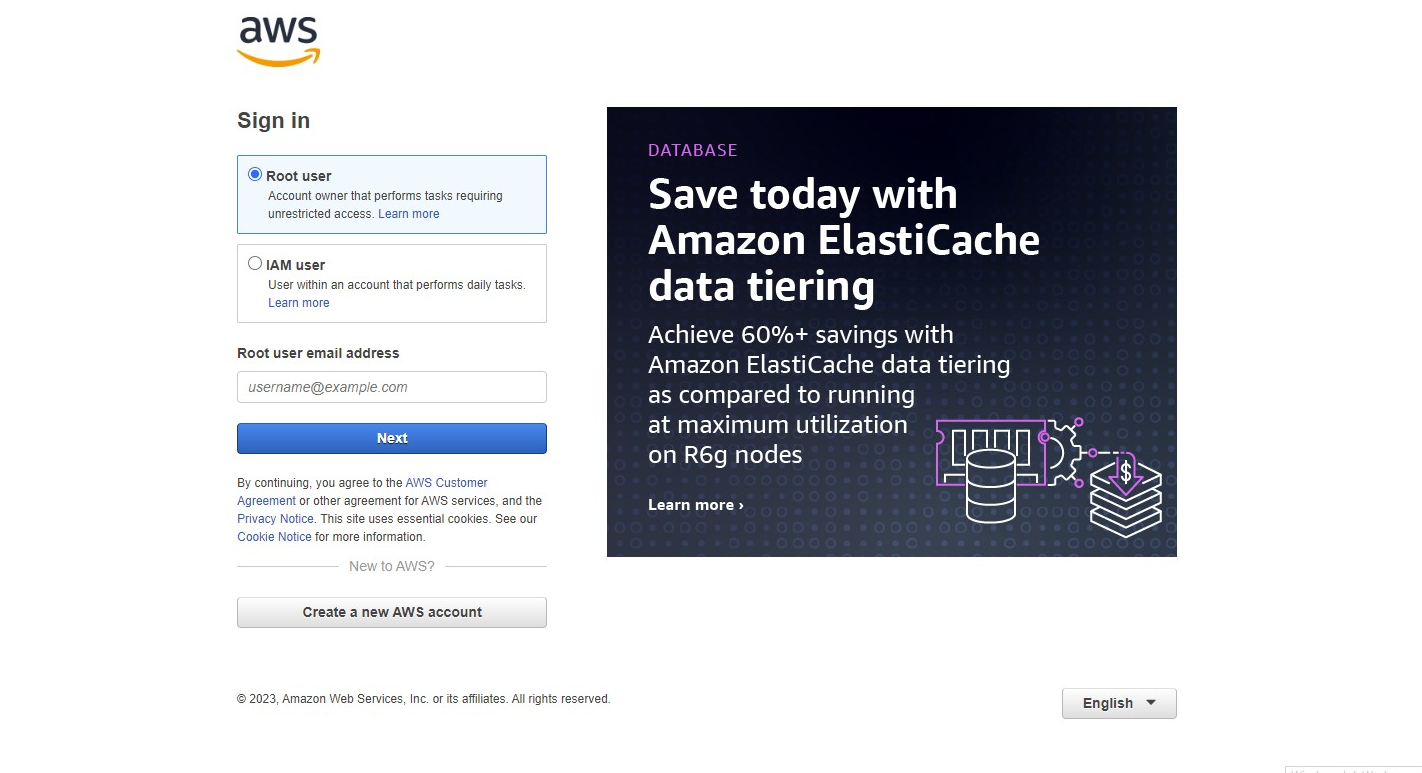
Now you'll find a prominent button labeled "Create a new AWS Account." Click on this button to proceed to the account creation page.
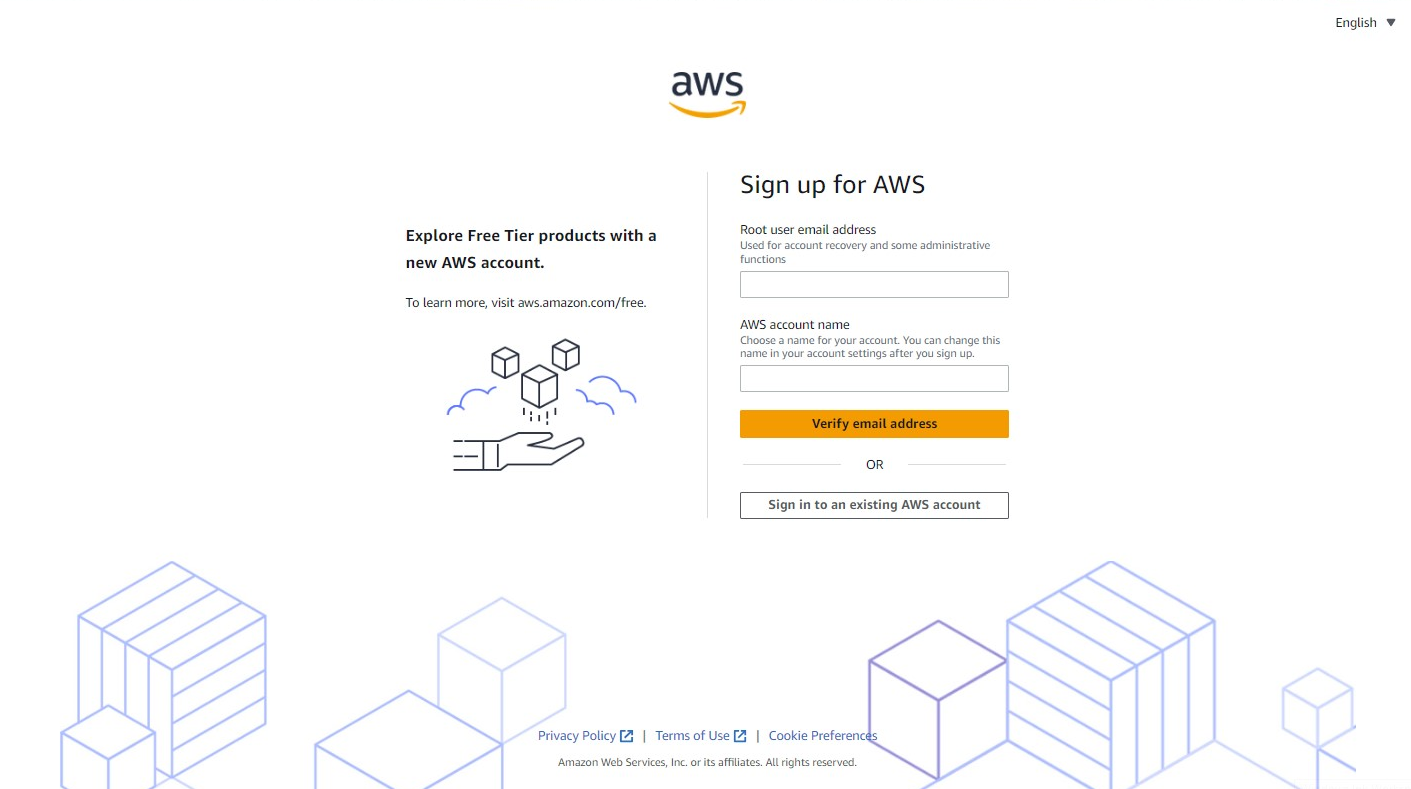
Provide your email address Enter your email address in the provided field. Make sure to use a valid email address as AWS will send you a verification email during the account creation process.
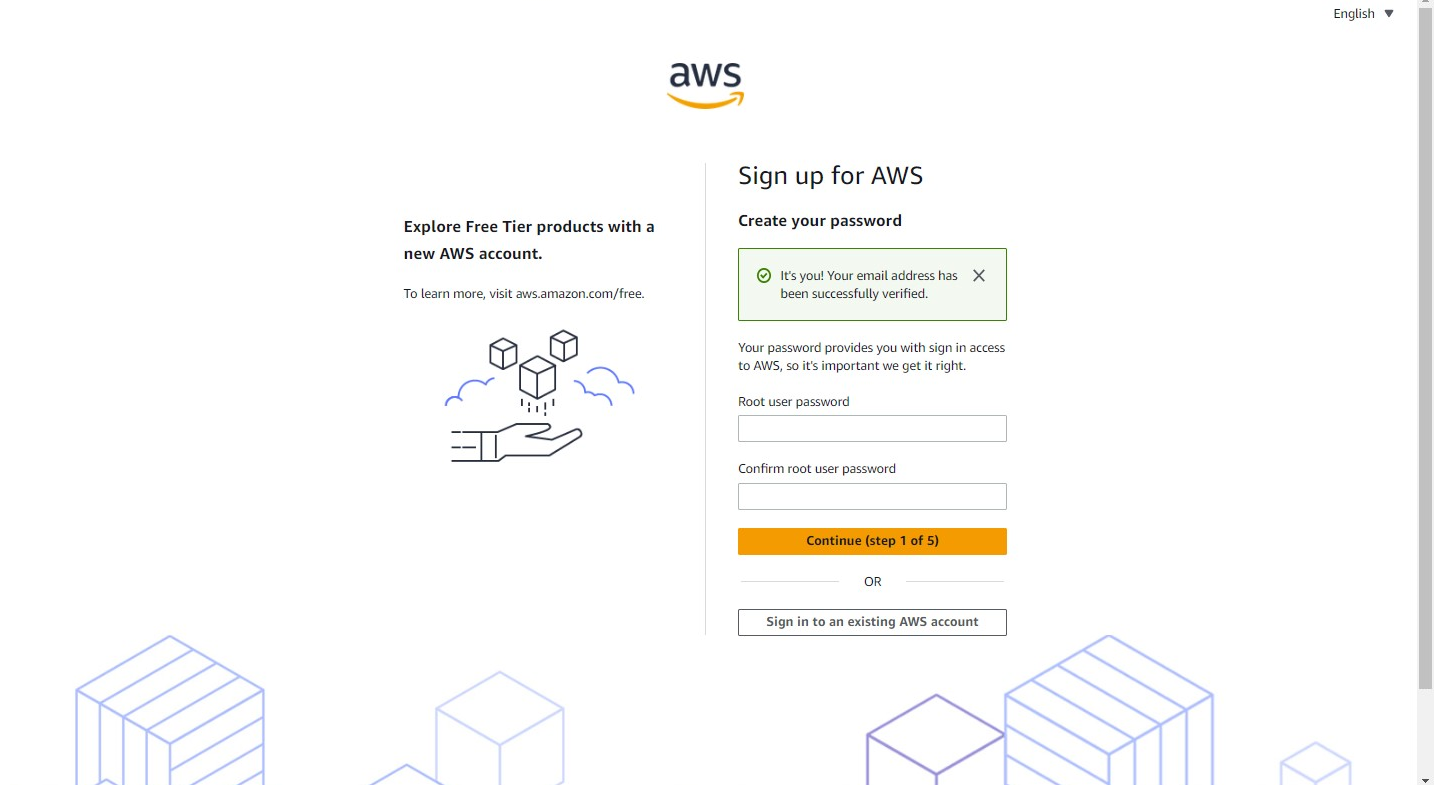
After verification, set a unique password remember password must be unique and it meet the following conditions:
It must have a minimum of 8 characters and a maximum of 128 characters.
It must include a minimum of three of the following mix of character types: uppercase, lowercase, numbers, and ! @ # $ % ^ & * () <> [] {} | _+-= symbols.
It must not be identical to your AWS account name or email address.
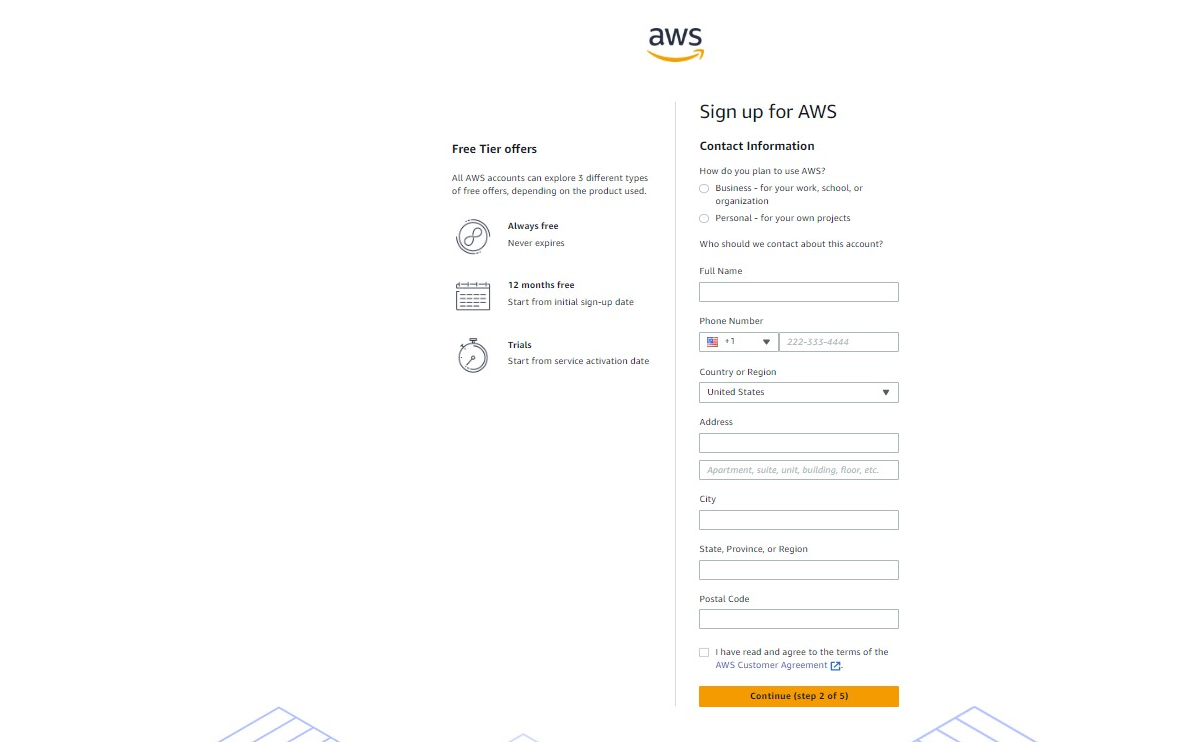
Step 4:
Enter your account information Next, you'll be asked to provide your account information. This includes your name, company (if applicable) and contact information. Fill in the required fields accurately.
Step 5:
Enter payment information AWS requires you to provide payment information, even for a free tier account. This is to ensure that you can seamlessly transition to paid services if you choose to do so in the future.
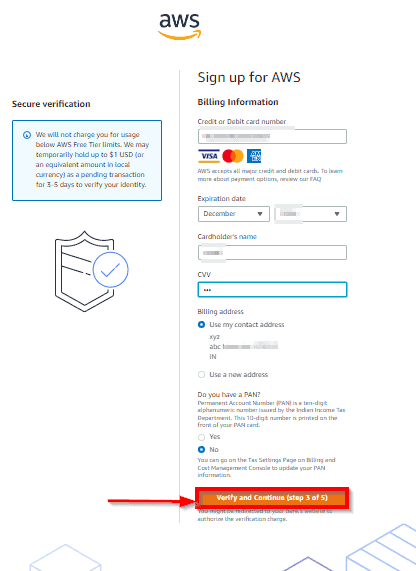
Note: Don't panic at this stage!
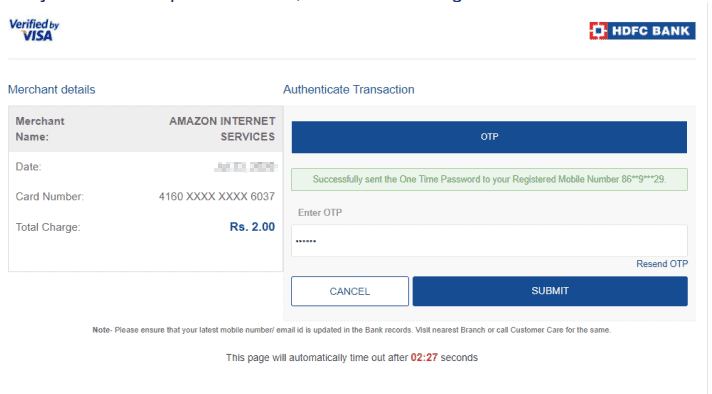
AWS will take you to the payment gateway to validate your payment information and for your Debit/credit card verification, Amazon will charge the minimum price based on Country. Here I have provided India, so Amazon charged 2 INR.
However, you won't be charged unless you explicitly use services beyond the free tier limits. Select your preferred payment method and enter the necessary details.
Step 6:
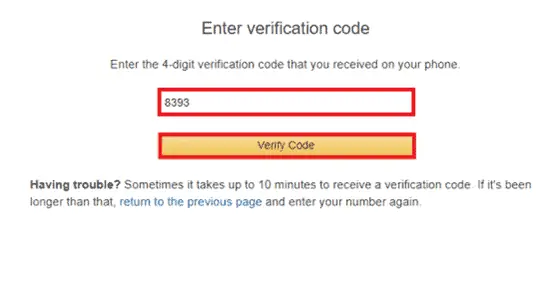
Complete the verification process After providing your payment information, AWS will initiate the verification process. You will be taken to an identity verification page that will already have your phone number, so you just have to select either “Text message or Voice call” Provide a valid phone number, Solve the captcha, and then click on Send SMS or Call Me Now(depending upon your selection).
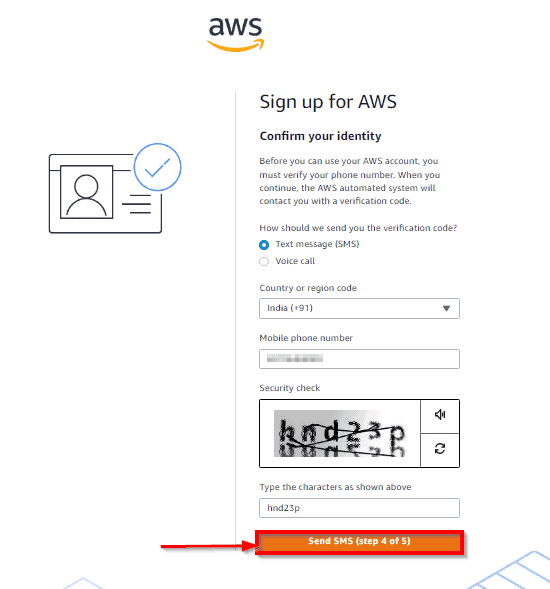
After clicking on Send SMS or Call me Now, you will immediately receive a call or SMS from Amazon, for verification code, Enter your code then click on Verify Code.
Step 7:
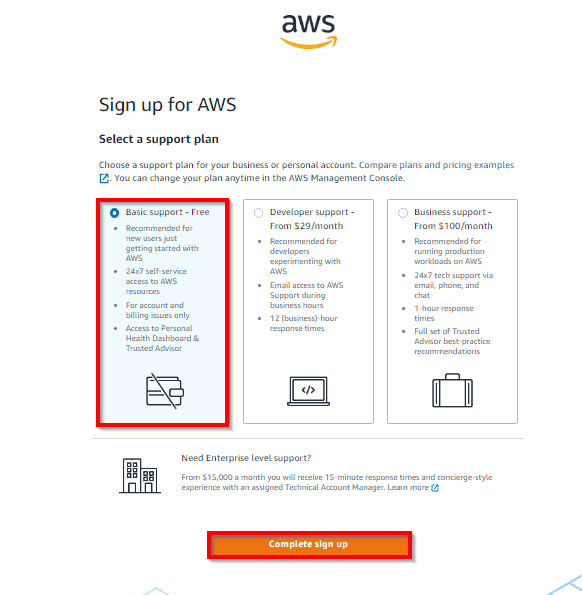
Choose a support plan AWS offers different support plans, including a free basic plan. Select the plan that suits your needs and budget. For a free tier account, the basic plan should be sufficient.
Step 8:
Explore the AWS Management Console Once you've completed the previous steps, you'll be redirected to the AWS Management Console. This is the central hub where you can access and manage various AWS services. Take some time to familiarize yourself with the console's layout and navigation.
Step 9:
Start using the AWS Free Tier Congratulations! You now have an AWS Free Tier account. The free tier offers a range of services, including computing, storage, databases, machine learning, and more. You can explore and experiment with these services within the specified usage limits, allowing you to gain hands-on experience with AWS without incurring any costs.
AWS Account Activation Troubleshooting
Ensuring your AWS Account is activated (please read)
Before proceeding you need to make sure your account is activated
The activation email looks like this (the content might be slightly different for you):
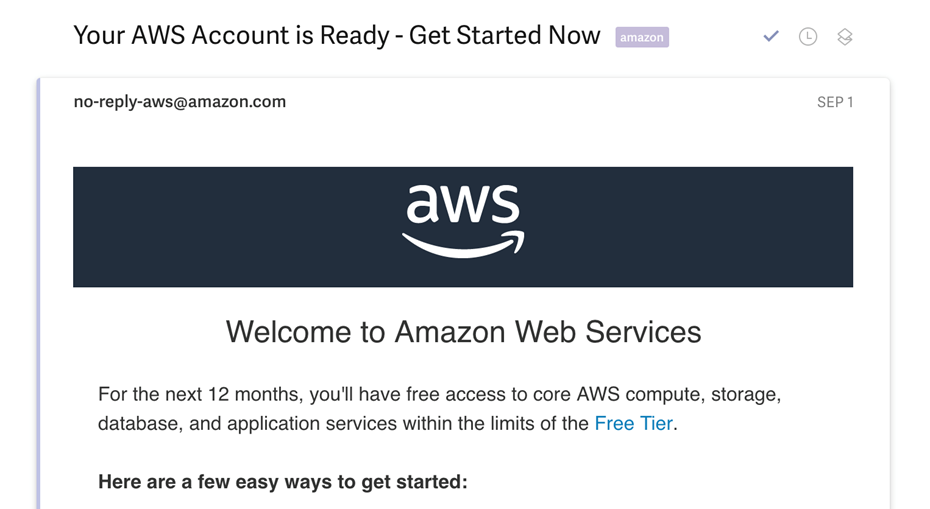
Note: The text might be slightly different for you, but as long as AWS says thank you, or welcome, and tells you to start using your account, it should mean it's activated.
Example: "Thank you for creating an Amazon Web Services (AWS) account. For the next 12 months, you will have free access to compute, storage, database, and application services. Learn more by visiting our Free Tier page. To access your account, click Access Account"
-----
To have your account activated, make sure to:
Add a Payment Method
Verify your phone number
Choose an AWS Support Plan (Free)
If your account is not activated yet, you will see this kind of error message:


How to get an account activation email? (may take up to 24 hours, usually just a few minutes)
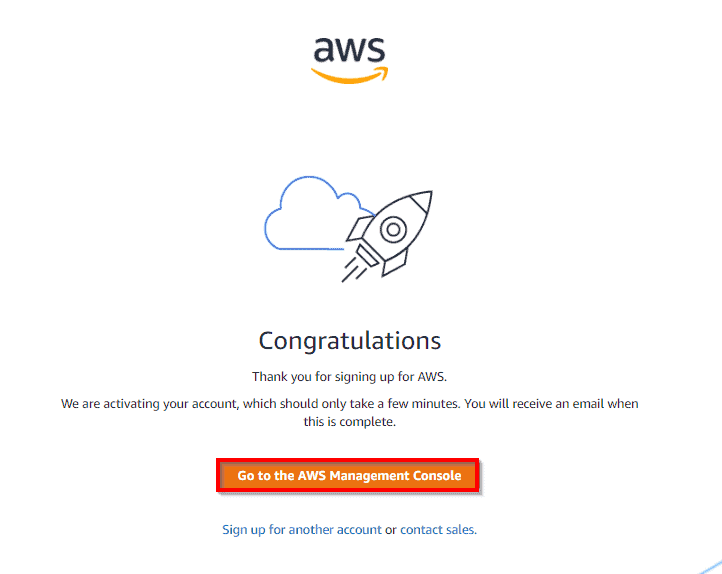
After you choose a Support plan, a confirmation page indicates that your account is being activated. Accounts are usually activated within a few minutes, but the process might take up to 24 hours.
You can sign in to your AWS account during this time. The AWS home page might display a button that shows "Complete Sign Up" during this time, even if you've completed all the steps in the sign-up process.
When your account is fully activated, you'll receive a confirmation email. After you receive this email, you have full access to all AWS services.
Troubleshooting delays in account activation
Account activation can sometimes be delayed. If the process takes more than 24 hours, check the following:
Finish the account activation process. You might have accidentally closed the window for the sign-up process before you added all the necessary information. To finish the sign-up process, open https://aws-portal.amazon.com/gp/aws/developer/registration/index.html and sign in using the email address and password you chose for the account.
Check the information associated with your payment method. Check Payment Methods in the AWS Billing and Cost Management console. Fix any errors in the information.
Contact your financial institution. Financial institutions occasionally reject authorization requests from AWS for various reasons. Contact your payment method's issuing institution and ask that they approve authorization requests from AWS.
Note: AWS cancels the authorization request as soon as it's approved by your financial institution. You aren't charged for authorization requests from AWS. Authorization requests might still appear as a small charge (usually 1 USD or 2 INR) on statements from your financial institution.Check your email for requests for additional information. Check your email to see if AWS needs any information from you to complete the activation process.
Try a different browser.
Contact AWS Support. Contact AWS Support for help. Be sure to mention any troubleshooting steps that you already tried.
Note: Don't provide sensitive information, such as Debit/credit card numbers, OTP, CVV, etc on phone calls in any correspondence with AWS.
How to Contact AWS Support?
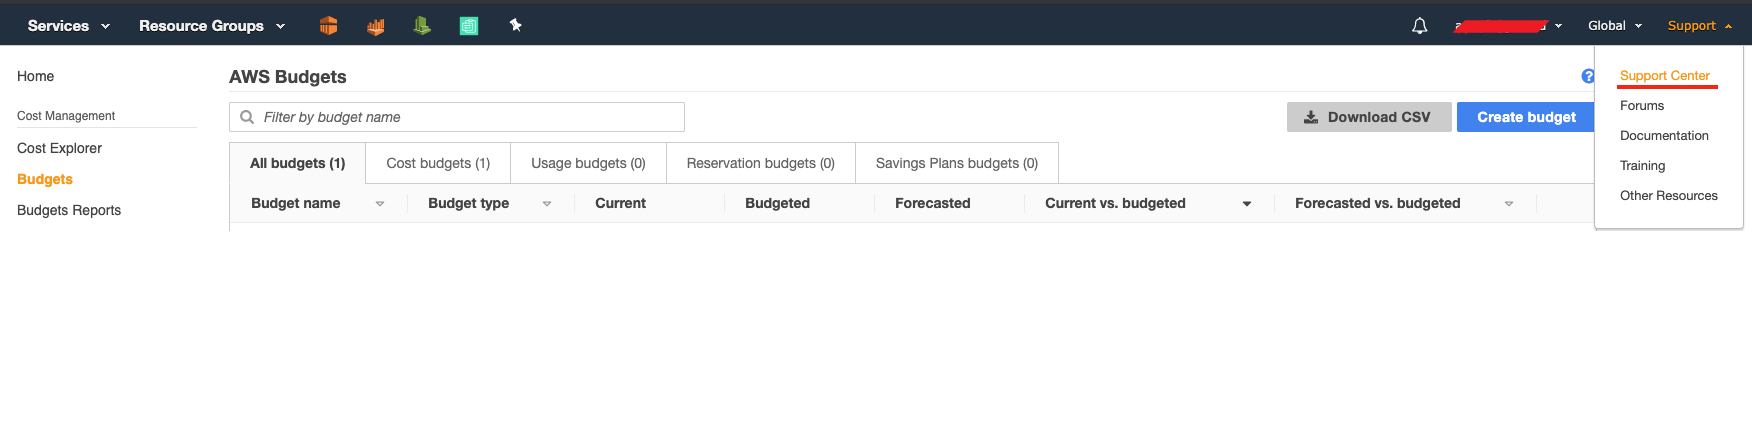
The top right corner will have Support > Support Center.
Ask them to activate the account, which can take up to 24 hours
Where to find more details?
Details can be found here: https://aws.amazon.com/premiumsupport/knowledge-center/create-and-activate-aws-account/
Conclusion
Creating an AWS Free Tier account is a straightforward process that opens up a world of possibilities for cloud computing and experimentation. By following the steps outlined in this guide, you can create your account and explore the various AWS services available. Remember to stay within the free tier limits to avoid unexpected charges. Happy exploring and learning in the AWS cloud!
Please share your thoughts and opinions on this topic in the comments section below.
The above information is up to my understanding and learning experience. Suggestions are always welcome.
~Abhiraj kharbade
#DevOps #AWS #FreeTier
Connect with me :


