

Step-by-Step Guide to Deploying a Flask and MongoDB Microservices Project on Kubernetes with Kubeadm
With troubleshooting.


Kubeadm Installation: Setting up a Kubernetes Cluster
Kubernetes is an open-source container orchestration system that automates the deployment, scaling, and management of containerized applications. Kubeadm is a tool that makes it easy to set up a Kubernetes cluster.
There are some prerequisites before moving further:
Two Ubuntu 22.04 LTS machines, one for the master node and the other for the worker node.
The master node will require more vCPU and memory hence instance type T2.medium for the Master node.
The worker does not require more vCpu and memory hence instance type T2.micro for Worker node.
Sudo privileges on both machines.
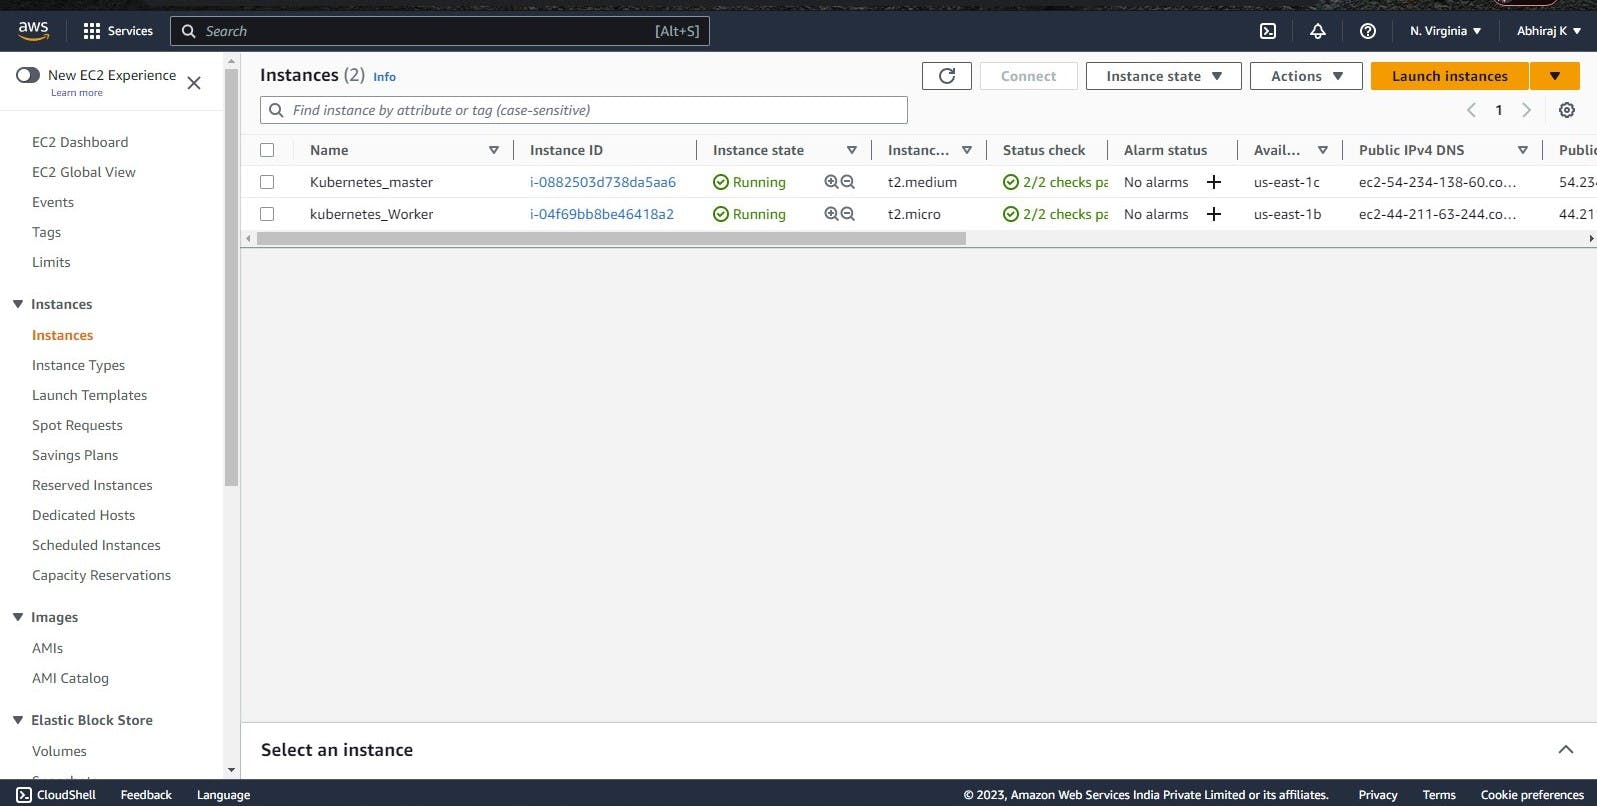
here I have created two EC2 instances of Ubuntu 22.04 LTS, one is named Kubernetes_master and another is kubernetes_worker as per the prerequisite
We will be dividing this installation and setup in 5 steps which are as follows:
Step 1: Update and Install Docker The first step is to update the system and install Docker on both machines. Docker is required to run the Kubernetes containers.
Run the following commands to update the system and install Docker:
 sudo apt update -y sudo apt install docker.io -y
 sudo systemctl start docker
 sudo systemctl enable docker
Step 2: Install Kubeadm The next step is to install Kubeadm on both machines. Kubeadm is a command-line tool that simplifies the process of creating and managing Kubernetes clusters.Run the following commands to install Kubeadm:
 sudo curl -fsSLo /usr/share/keyrings/kubernetes-archive-keyring.gpg https://packages.cloud.google.com/apt/doc/apt-key.gpg

 echo "deb [signed-by=/usr/share/keyrings/kubernetes-archive-keyring.gpg] https://apt.kubernetes.io/ kubernetes-xenial main" | sudo tee /etc/apt/sources.list.d/kubernetes.list

 sudo apt update -y
 sudo apt install kubeadm=1.20.0-00 kubectl=1.20.0-00 kubelet=1.20.0-00 -y
Step 3: Configure the Master Node The next step is to configure the master node. Run the following commands on the master node:
 sudo su
 kubeadm init

 mkdir -p $HOME/.kube
 sudo cp -i /etc/kubernetes/admin.conf $HOME/.kube/config
 sudo chown $(id -u):$(id -g) $HOME/.kube/config

 kubectl apply -f https://github.com/weaveworks/weave/releases/download/v2.8.1/weave-daemonset-k8s.yaml

 kubeadm token create --print-join-command
The kubeadm init command initializes the master node. The mkdir command creates a directory for the Kubernetes configuration file. The cp and chown commands copy the configuration file and set the correct permissions. The kubectl apply command installs Weave Net, which is a popular networking plugin for Kubernetes. The kubeadm token create command creates a token for joining worker nodes to the cluster.
Step 4: Configure the Worker Node The final step is to configure the worker node. Run the following commands on the worker node:
 sudo su
 kubeadm reset pre-flight checks
 # Paste the Join command on worker node with `--v=5`
The kubeadm reset pre-flight checks command checks if the system meets the requirements for joining the Kubernetes cluster. Then, paste the kubeadm token create command output from the master node on the worker node with the --v=5 flag. This joins the worker node to the Kubernetes cluster.
Step 5: Verify the Cluster Finally, run the following command on the master node to verify that the cluster is up and running
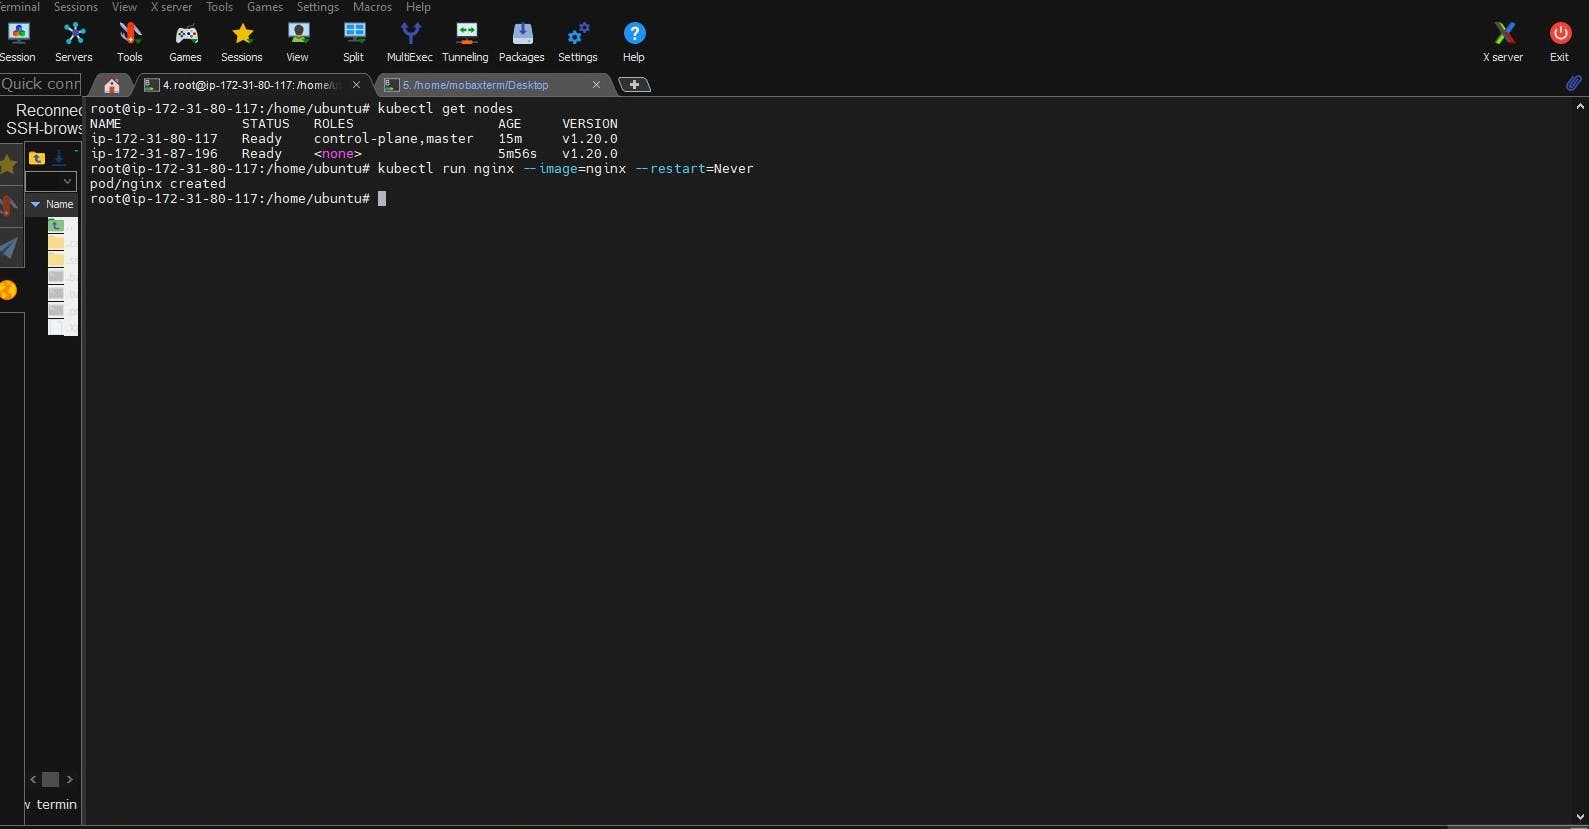
kubectl get nodes
This command lists all the nodes in the cluster. If everything is set up correctly, the output should show both the master and worker nodes.
For starter, we can use kubectl run mypod --image= --restart=Never
The kubectl run command creates a new deployment or a new pod. In this case, it creates a new pod named mypod using the Docker image specified by .
Here's a breakdown of the command:
kubectl run: The base command to create a new deployment or pod. mypod: The name of the pod to be created. You can choose any name you like. --image=: Specifies the Docker image to use for the pod. Replace with the name of the Docker image you want to use. --restart=Never: Specifies that the pod should not be restarted automatically if it fails or terminates. This means that if the pod crashes or is deleted, it will not be automatically recreated. When you run this command, Kubernetes will create a new pod with the specified Docker image and launch it in your cluster. You can then use other kubectl commands to interact with and manage the pod.
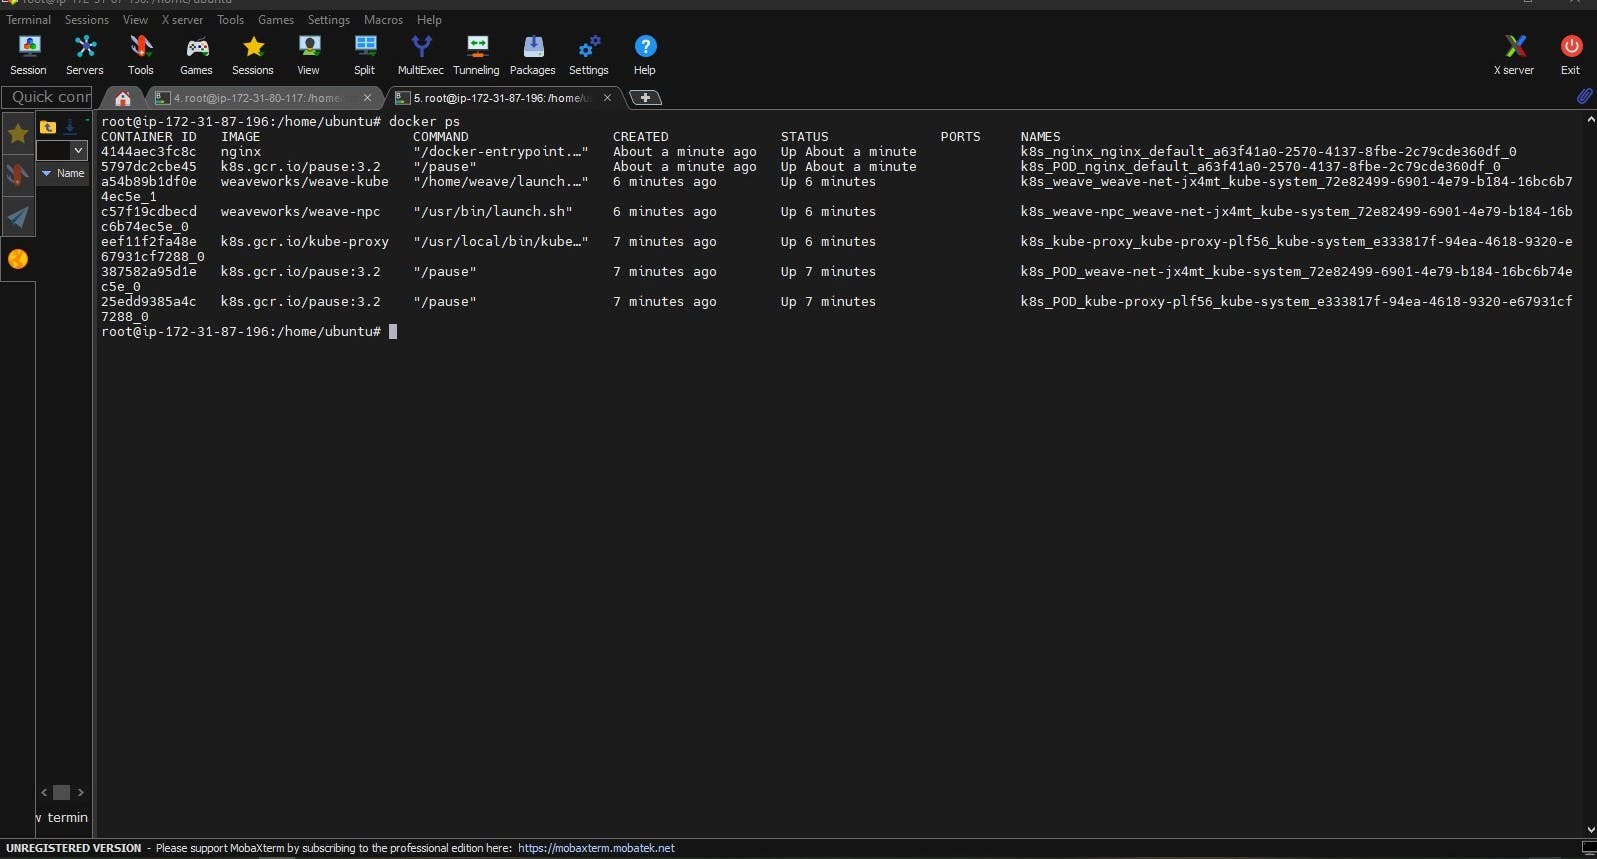
Now I have created a pod that runs Nginx image through Master see the results in the worker node:
ScreenSnap of Master Node where kubectl run nginx --image=nginx --restart=Never is used:
Screensnap of Worker Node where Nginx container is orchestrated from master:
DevOps Kubernetes Project: Microservices on Kubeadm with Flask & MongoDB + Troubleshooting
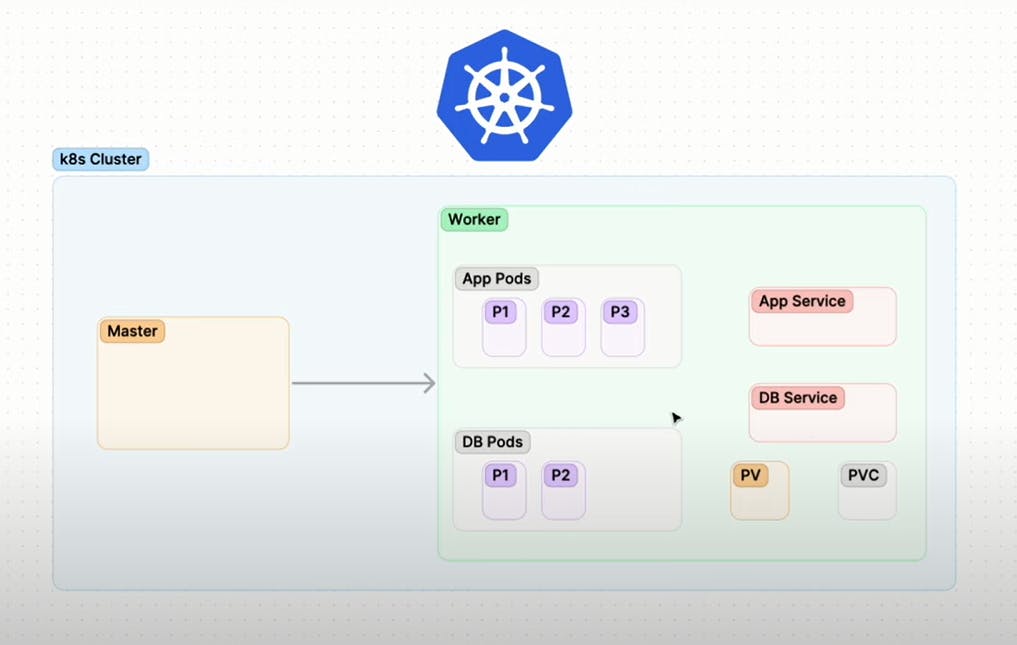
What this project is about?
In this project we will be doing:
Deploying taskmaster micro-service
Expose the services
Integrate persistent volume and persistent volume claim
Deploy MongoDB
Integrate micro-service and troubleshoot
Steps:
cd /
mkdir taskmaster
git init
git clone https://github.com/Abhiraj2310/microservices-k8s.git
Open a terminal and navigate to the root directory of your file system by typing cd /.
Create a new directory for your project by typing mkdir taskmaster. This will create a new directory called "taskmaster" in your current directory.
Initialize a new Git repository in your project directory by typing git init. This will create a new Git repository that you can use to track changes to your code.
Clone an existing Git repository that contains the code for your Flask API by typing git clone https://github.com/Abhiraj2310/microservices-k8s.git. This will create a new directory called "microservices-k8s" in your taskmaster directory and copy the code for your Flask API into it.
cd taskmaster/microservices-k8s/flask-api/k8s
ls
mongo-pv.yml  mongo-pvc.yml  mongo-svc.yml  mongo.yml  taskmaster-svc.yml  taskmaster.yml

kubectl apply -f taskmaster.yml
#deployment.apps/taskmaster created
kubectl apply -f taskmaster-svc.yml
#service/taskmaster-svc created
Navigate to the directory where your Kubernetes configuration files are located by typing cd taskmaster/microservices-k8s/flask-api/k8s.
Check that the files in this directory are correct by typing ls. This should display a list of files including taskmaster.yml, taskmaster-svc.yml, mongo-pv.yml, mongo-pvc.yml, mongo.yml, and mongo-svc.yml.
Apply the Kubernetes configuration in the taskmaster.yml file by typing kubectl apply -f taskmaster.yml. This will create a new deployment named "taskmaster" in your Kubernetes cluster, based on the configuration in the taskmaster.yml file.
Apply the Kubernetes configuration in the taskmaster-svc.yml file by typing kubectl apply -f taskmaster-svc.yml. This will create a new service named "taskmaster-svc" in your Kubernetes cluster, based on the configuration in the taskmaster-svc.yml file
kubectl apply -f mongo-pv.yml
#persistentvolume/mongo-pv created
kubectl apply -f mongo-pvc.yml
#persistentvolumeclaim/mongo-pvc created
kubectl apply -f mongo.yml
#deployment.apps/mongo created
kubectl apply -f mongo-svc.yml
#service/mongo created
Apply the Kubernetes configuration in the mongo-pv.yml file by typing kubectl apply -f mongo-pv.yml. This will create a new persistent volume named "mongo-pv" in your Kubernetes cluster, based on the configuration in the mongo-pv.yml file.
Apply the Kubernetes configuration in the mongo-pvc.yml file by typing kubectl apply -f mongo-pvc.yml. This will create a new persistent volume claim named "mongo-pvc" in your Kubernetes cluster, based on the configuration in the mongo-pvc.yml file.
Apply the Kubernetes configuration in the mongo.yml file by typing kubectl apply -f mongo.yml. This will create a new deployment named "mongo" in your Kubernetes cluster, based on the configuration in the mongo.yml file.
Apply the Kubernetes configuration in the mongo-svc.yml file by typing kubectl apply -f mongo-svc.yml. This will create a new service named "mongo" in your Kubernetes cluster, based on the configuration in the mongo-svc.yml file

Check that the service was successfully created by typing kubectl get svc. This command will show you a list of all the services in your Kubernetes cluster, along with their type, IP address, and exposed ports.
In the output of the kubectl get svc command, you should see a line that says "mongo". This line indicates that the "mongo" service was created successfully.
The TYPE column indicates that the "mongo" service is a "ClusterIP" service. This means that the service is only accessible within the Kubernetes cluster itself, and not from outside the cluster.
The CLUSTER-IP column shows the internal IP address that has been assigned to the "mongo" service.
The EXTERNAL-IP column shows that no external IP address has been assigned to the "mongo" service. This is because the service is not exposed to the public internet.
The PORT(S) column shows that the "mongo" service is listening on port 27017.
The AGE column shows how long ago the "mongo" service was created, which in this case is 14 seconds.
For this Project to work we require to open certain ports in security group:
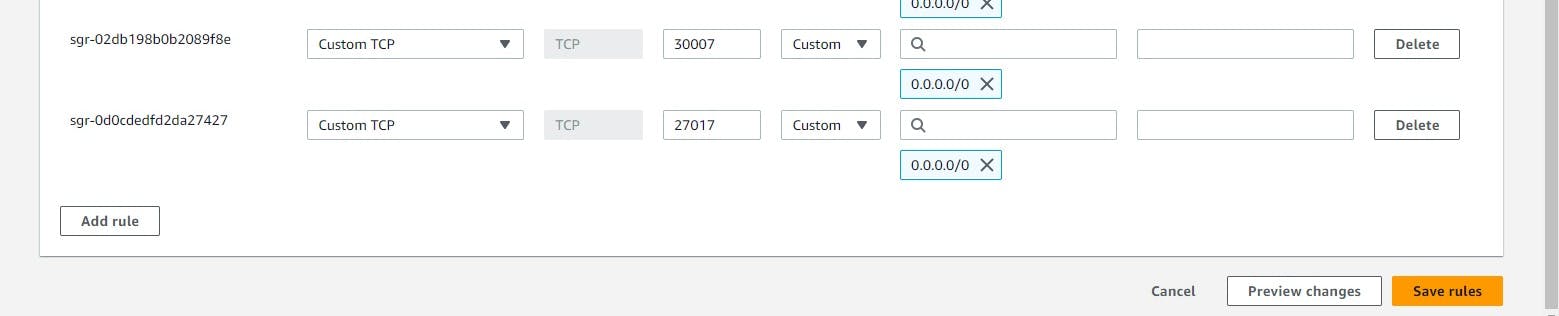
For checkng if the application works or not hit the https//<PublicIPadress>:30007/tasks
DevOps Troubleshooting
Possible error:
This is Error 500: Internal Server error It might be a possible error if you fail to setup the project properly.

This error code indicates that there's been an internal server error. It could be caused by a problem with the server software, or by a script or plugin that's causing an issue. The server will return a 500 error code along with a message telling you that there's been an internal server error.
Possible ways to resolve:
A 500 error is an HTTP status code that indicates an internal server error. When an application hosted on Kubernetes returns a 500 error, it means that there is an issue with the application that needs to be addressed. Here are some possible ways to resolve a 500 error on Kubernetes:
Check application logs: The first step in resolving a 500 error is to check the application logs. Kubernetes provides tools like kubectl logs to view the logs of a running container. By analyzing the logs, you may be able to identify the root cause of the error and take appropriate actions to fix it.
Verify application configuration: Verify that the application configuration is correct. Ensure that the application is running on the right port and that all environment variables are properly set up.
Check resource utilization: Ensure that the application is not consuming too many resources like CPU and memory, which could result in a server error. Use Kubernetes monitoring tools like Prometheus to monitor the resource utilization of your application.
Check network connectivity: Check that the application is reachable from the outside network. Ensure that the Kubernetes service is properly configured and is exposing the application to the right ports.
Restart the application: If the issue is not immediately apparent, you can try restarting the application to see if that resolves the error.
Rollback to the previous version: If the application was recently updated and the 500 error started occurring after the update, consider rolling back to the previous version to see if that resolves the issue.
Update dependencies: If the application is using outdated dependencies, it may cause a 500 error. Consider updating the dependencies to their latest versions.
Check for known issues: Check if there are any known issues with the application or Kubernetes version being used. You can check the release notes and community forums to identify and resolve known issues.
Get help from the community: If you are still unable to resolve the 500 error, you can seek help from the Kubernetes community. You can post your query on community forums or file a support ticket to get help from experts.
Other possible errors and there troubleshooting in Kubernetes.
Pod Scheduling Errors
One of the most common errors in Kubernetes is pod scheduling errors. These errors occur when Kubernetes is unable to schedule a pod to a node due to resource constraints. To troubleshoot this error, you can use the kubectl describe pod command to get more information about the scheduling failure. For example:
$ kubectl describe pod <pod-name>
This command will provide detailed information about the pod and the reasons for the scheduling failure. You can then use this information to either adjust the resource requests of the pod or add more resources to the cluster.
Networking Errors
Networking errors can occur when containers in different pods or nodes are unable to communicate with each other. This can happen due to misconfigured network policies or firewall rules. To troubleshoot this error, you can use the kubectl logs command to check the logs of the affected container. For example:
$ kubectl logs <pod-name> <container-name>
This command will provide the logs of the container, which can help identify the cause of the networking error. You can also use the kubectl exec command to log into the container and check the network configuration. For example:
$ kubectl exec -it <pod-name> -- /bin/bash
This command will open a shell inside the container, where you can check the network configuration and connectivity.
Persistent Volume Errors
Persistent volumes (PVs) are used to store data that needs to persist beyond the lifecycle of a pod. PV errors can occur when the PV is not properly mounted or is unavailable. To troubleshoot this error, you can use the kubectl describe pv command to get more information about the PV status. For example:
$ kubectl describe pv <pv-name>
This command will provide detailed information about the PV and the reasons for the error. You can then use this information to either fix the mounting issue or check the availability of the PV.
API Server Errors
API server errors can occur when there is a problem with the Kubernetes API server. This can happen due to misconfigured certificates, network issues, or other system errors. To troubleshoot this error, you can check the logs of the API server using the kubectl logs command. For example:
$ kubectl logs -n kube-system kube-apiserver-<node-name>
This command will provide the logs of the API server, which can help identify the cause of the error.
Image Pull Errors
Image pull errors can occur when Kubernetes is unable to pull the container image from the registry. This can happen due to network issues, authentication problems, or misconfigured image tags. To troubleshoot this error, you can use the kubectl describe pod command to get more information about the error. For example:
$ kubectl describe pod <pod-name>
Conclusion
In conclusion, deploying a Flask and MongoDB microservices project on Kubernetes with Kubeadm can seem intimidating at first, but with the right guidance and troubleshooting, it is a manageable task. By following the step-by-step guide outlined in this blog, you should be able to deploy your project with ease.
Throughout the process, it is important to keep in mind the best practices for Kubernetes deployment, such as creating separate deployments for each microservice, using persistent volumes for data storage, and ensuring proper resource allocation.
When troubleshooting, it is essential to identify the root cause of the issue and use Kubernetes tools such as kubectl logs and describe to help diagnose and solve the problem. Additionally, utilizing Kubernetes resources such as ConfigMaps and Secrets can help manage and store sensitive configuration information.
Overall, deploying a Flask and MongoDB microservices project on Kubernetes with Kubeadm is an excellent way to improve scalability and resilience.
The above information is up to my understanding and learning. Suggestions are always welcome.
~Abhiraj kharbade
#Kubernetes #Devops #Trainwithshubham #Kubeweek #kubeweekchallenge #Day7challenge