"Mastering Kubernetes: Understanding Architecture and Components, Installation, and Configuration"
Kubernetes is an open-source container orchestration platform that is used to manage and deploy containerized applications at scale. It is designed to simplify the management of containerized applications by automating the deployment, scaling, and management of containerized workloads. In this blog post, we will take a deep dive into the architecture, components of Kubernetes and walk through the installation process of Kubeadm on both the master and worker nodes, and set up a Kubernetes cluster.
Kubernetes Architecture:
Kubernetes architecture is built around a master-slave model. The master node is responsible for managing the overall cluster, while the slave nodes, also known as worker nodes, run the containerized applications.
The following diagram illustrates the architecture of a Kubernetes cluster:

The Kubernetes architecture consists of the following components:
Master Components: The master components are responsible for managing the overall Kubernetes cluster. They include:
a. Kubernetes API Server: The API server is the central control plane of the Kubernetes cluster. It provides a RESTful interface for communication with other components of the cluster.
b. etcd: etcd is a distributed key-value store that is used to store the configuration data and the state of the Kubernetes cluster.
c. Kube-Controller Manager: The controller manager is responsible for managing the various controllers that are responsible for maintaining the desired state of the cluster.
d. Kube-Scheduler: The scheduler is responsible for scheduling the containerized workloads to the worker nodes.
Node Components: The node components are responsible for running the containerized workloads. They include:
a. Kubelet: The kubelet is responsible for managing the containerized workloads on a node. It communicates with the API server to receive instructions on how to manage the containers.
b. Container Runtime: The container runtime is responsible for running the containers on a node. It could be Docker, rkt, or any other container runtime that supports the Kubernetes Container Runtime Interface (CRI).
c. kube-proxy: The kube-proxy is responsible for managing the network connectivity of the containers running on a node.
Kubernetes Components:
Kubernetes has several components that work together to enable the management of containerized workloads. These components include:
Pods: A pod is the smallest deployable unit in Kubernetes. It is a logical host for one or more containers. Pods are used to isolate, deploy, and scale containerized workloads. Each pod has its IP address and shares the same network namespace.
ReplicaSets: A ReplicaSet is a Kubernetes resource that is responsible for managing the desired number of replicas of a pod. It ensures that the number of replicas of a pod is always maintained, even if a node fails.
Deployments: A Deployment is a Kubernetes resource that is used to manage the deployment of containerized applications. It is responsible for creating and updating ReplicaSets to ensure that the desired state of the application is maintained. Deployments provide features like rolling updates and rollbacks, making it easy to update or revert to a previous version of the application.
Services: A Service is a Kubernetes resource that provides a stable IP address and DNS name for a set of pods. Services enable pods to communicate with each other and with the outside world. They provide load balancing and routing of network traffic to the pods.
ConfigMaps: A ConfigMap is a Kubernetes resource that is used to store configuration data for an application. It enables the separation of application configuration from the application code, making it easier to manage and update the configuration.
Secrets: A Secret is a Kubernetes resource that is used to store sensitive data like passwords, API keys, and certificates. Secrets are encrypted and stored in etcd, ensuring that the sensitive data is secure.
Kubeadm Installation: Setting up a Kubernetes Cluster
Kubernetes is an open-source container orchestration system that automates the deployment, scaling, and management of containerized applications. Kubeadm is a tool that makes it easy to set up a Kubernetes cluster.
There are some prerequisites before moving further:
Two Ubuntu 22.04 LTS machines, one for the master node and the other for the worker node.
The master node will require more vCPU and memory hence instance type T2.medium for the Master node.
The worker does not require more vCpu and memory hence instance type T2.micro for Worker node.
Sudo privileges on both machines.

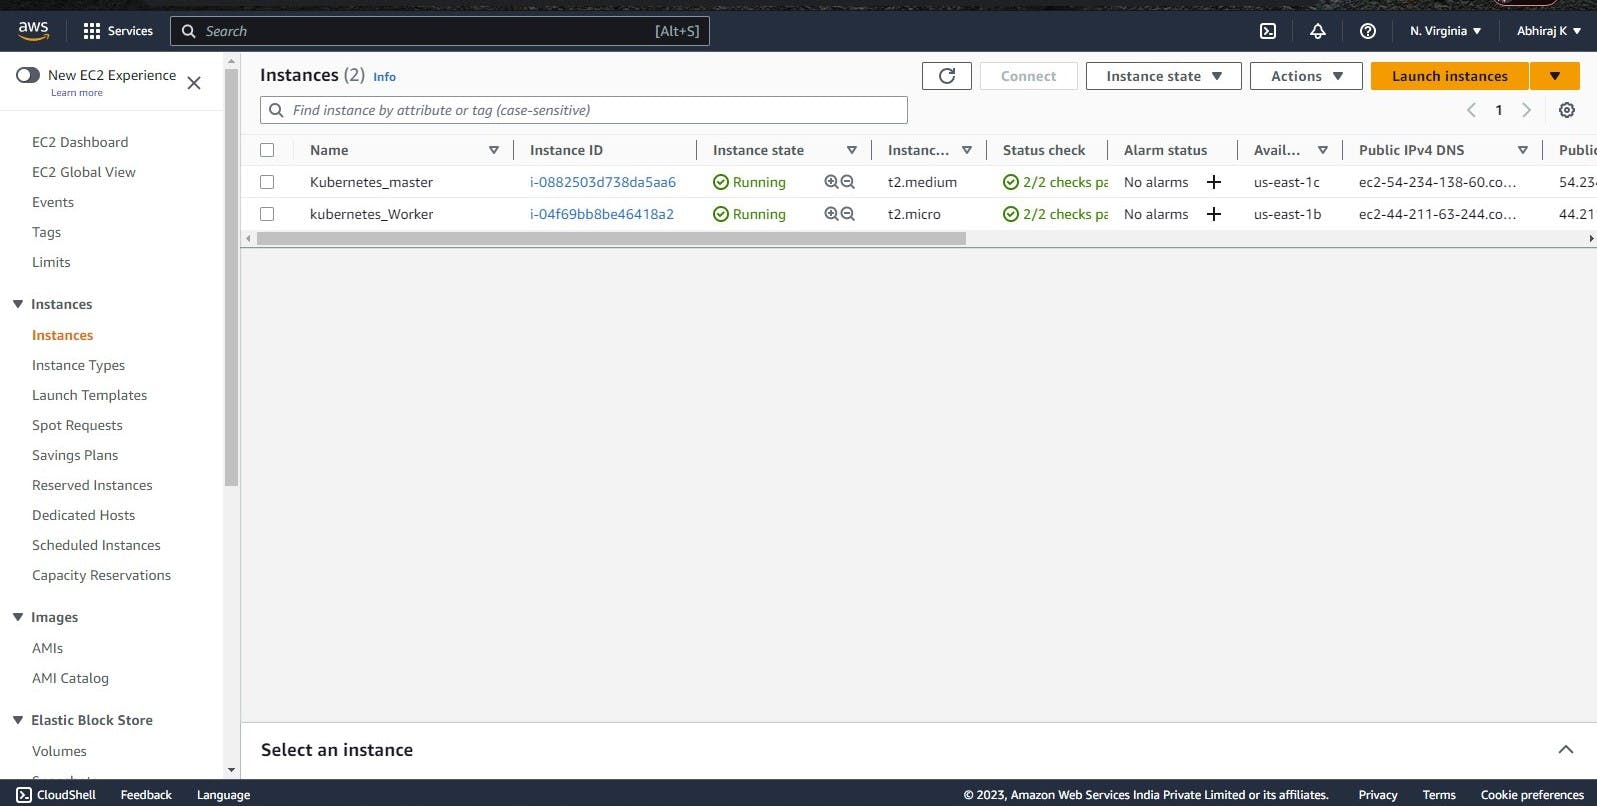
here I have created two EC2 instances of Ubuntu 22.04 LTS, one is named Kubernetes_master and another is kubernetes_worker as per the prerequisite
We will be dividing this installation and setup in 5 steps which are as follows:
Step 1: Update and Install Docker The first step is to update the system and install Docker on both machines. Docker is required to run the Kubernetes containers.
Run the following commands to update the system and install Docker:
 sudo apt update -y sudo apt install docker.io -y
 sudo systemctl start docker
 sudo systemctl enable docker
Step 2: Install Kubeadm The next step is to install Kubeadm on both machines. Kubeadm is a command-line tool that simplifies the process of creating and managing Kubernetes clusters.Run the following commands to install Kubeadm:
 sudo curl -fsSLo /usr/share/keyrings/kubernetes-archive-keyring.gpg https://packages.cloud.google.com/apt/doc/apt-key.gpg

 echo "deb [signed-by=/usr/share/keyrings/kubernetes-archive-keyring.gpg] https://apt.kubernetes.io/ kubernetes-xenial main" | sudo tee /etc/apt/sources.list.d/kubernetes.list

 sudo apt update -y
 sudo apt install kubeadm=1.20.0-00 kubectl=1.20.0-00 kubelet=1.20.0-00 -y
Step 3: Configure the Master Node The next step is to configure the master node. Run the following commands on the master node:
 sudo su
 kubeadm init

 mkdir -p $HOME/.kube
 sudo cp -i /etc/kubernetes/admin.conf $HOME/.kube/config
 sudo chown $(id -u):$(id -g) $HOME/.kube/config

 kubectl apply -f https://github.com/weaveworks/weave/releases/download/v2.8.1/weave-daemonset-k8s.yaml

 kubeadm token create --print-join-command
The kubeadm init command initializes the master node. The mkdir command creates a directory for the Kubernetes configuration file. The cp and chown commands copy the configuration file and set the correct permissions. The kubectl apply command installs Weave Net, which is a popular networking plugin for Kubernetes. The kubeadm token create command creates a token for joining worker nodes to the cluster.
Step 4: Configure the Worker Node The final step is to configure the worker node. Run the following commands on the worker node:
 sudo su
 kubeadm reset pre-flight checks
 # Paste the Join command on worker node with `--v=5`
The kubeadm reset pre-flight checks command checks if the system meets the requirements for joining the Kubernetes cluster. Then, paste the kubeadm token create command output from the master node on the worker node with the --v=5 flag. This joins the worker node to the Kubernetes cluster.
Step 5: Verify the Cluster Finally, run the following command on the master node to verify that the cluster is up and running
kubectl get nodes
This command lists all the nodes in the cluster. If everything is set up correctly, the output should show both the master and worker nodes.
For starter, we can use kubectl run mypod --image= --restart=Never
The kubectl run command creates a new deployment or a new pod. In this case, it creates a new pod named mypod using the Docker image specified by .
Here's a breakdown of the command:
kubectl run: The base command to create a new deployment or pod. mypod: The name of the pod to be created. You can choose any name you like. --image=: Specifies the Docker image to use for the pod. Replace with the name of the Docker image you want to use. --restart=Never: Specifies that the pod should not be restarted automatically if it fails or terminates. This means that if the pod crashes or is deleted, it will not be automatically recreated. When you run this command, Kubernetes will create a new pod with the specified Docker image and launch it in your cluster. You can then use other kubectl commands to interact with and manage the pod.
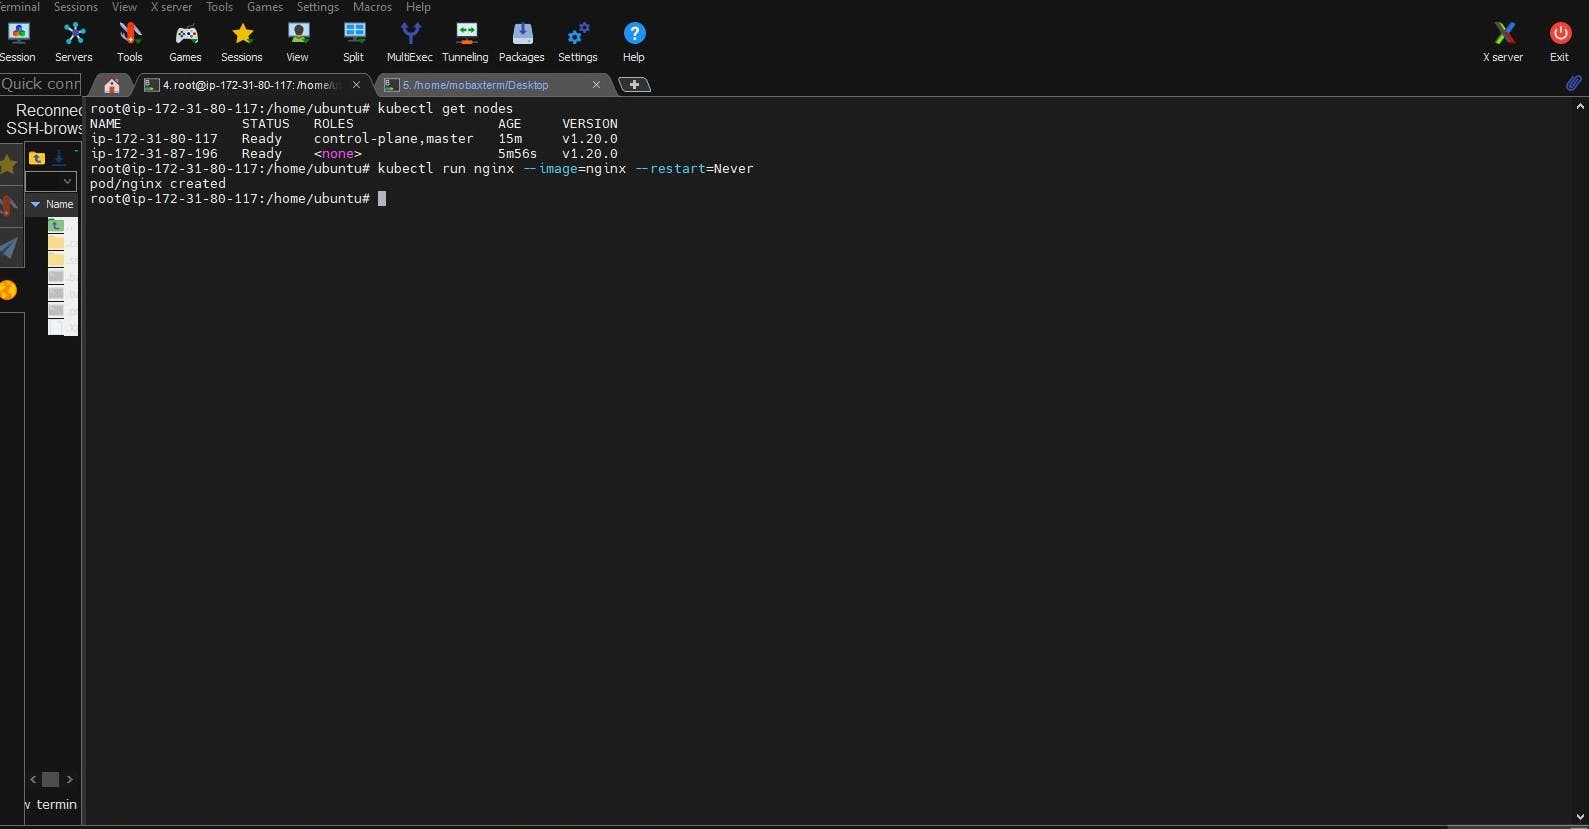
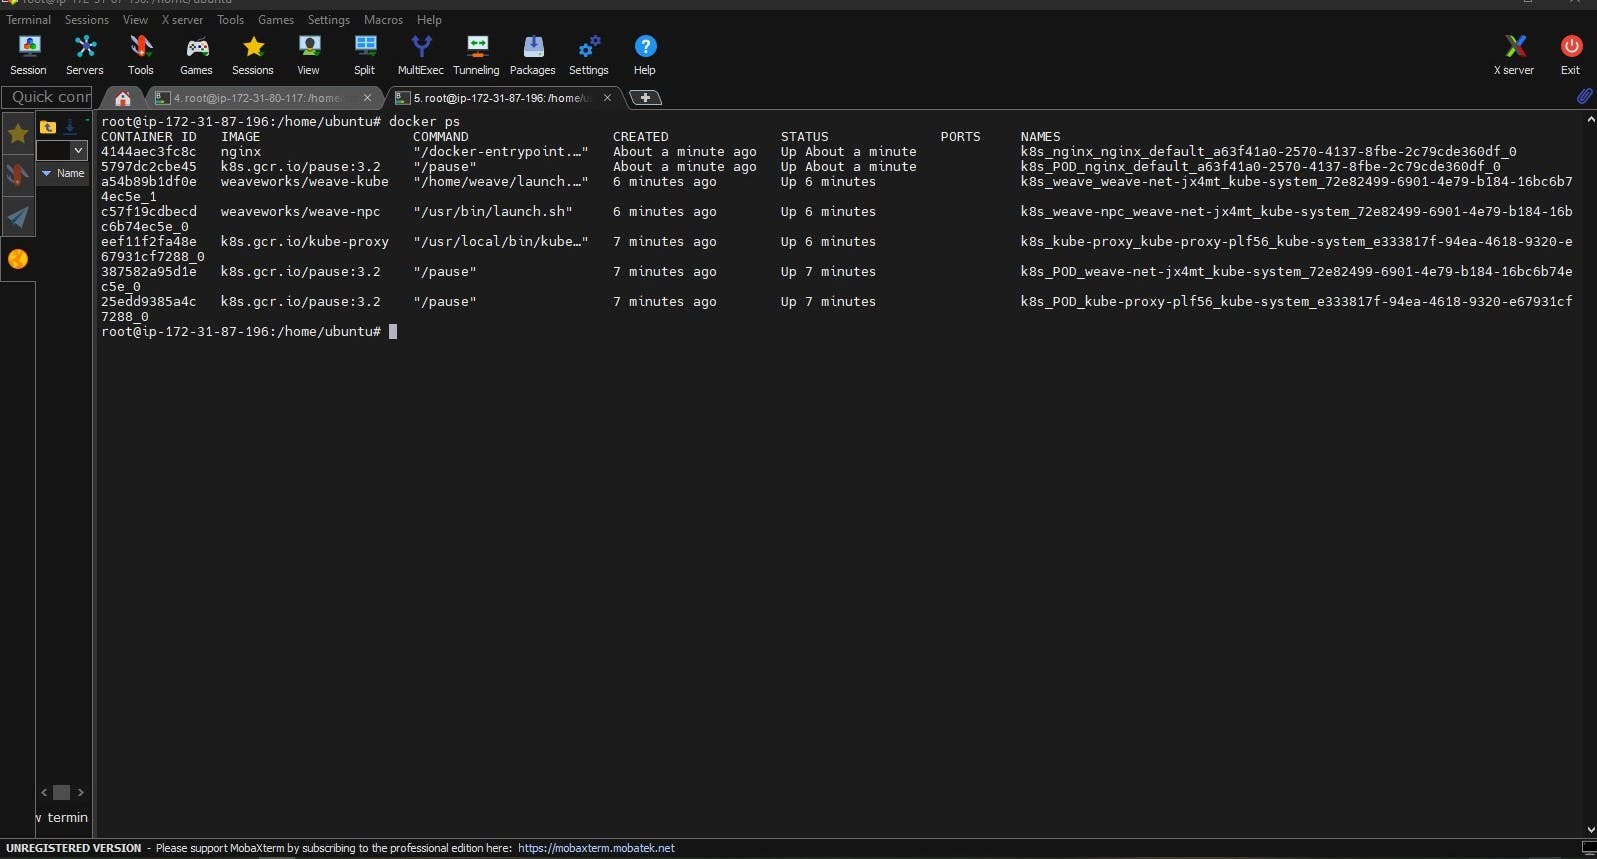
Now I have created a pod that runs Nginx image through Master see the results in the worker node:
ScreenSnap of Master Node where kubectl run nginx --image=nginx --restart=Never is used:

Screensnap of Worker Node where Nginx container is orchestrated from master:

Conclusion:
Kubernetes is a powerful container orchestration platform that provides a flexible and scalable solution for managing containerized workloads. Kubeadm simplifies the process of setting up a Kubernetes cluster, allowing you to quickly set up a Kubernetes cluster and start deploying and managing containerized applications. Its architecture is built around a master-slave model, with the master node responsible for managing the overall cluster and the slave nodes responsible for running the containerized applications. Kubernetes has several components that work together to enable the management of containerized workloads, including Pods, ReplicaSets, Deployments, Services, ConfigMaps, and Secrets. By leveraging these components, Kubernetes provides a robust platform for deploying and scaling containerized applications.
The above information is up to my understanding. Suggestions are always welcome.
~Abhiraj kharbade
#Kubernetes #Devops #Trainwithshubham #Kubeweek #kubeweekchallenge Shubham Londhe
